Wednesday, December 16, 2009

Kiss on the Cheek, not on the Lips!

I read somewhere that the person in charge of etiquette in England (yes, there is such a person) recommended that with the flu going around this season, that when encountering someone under the mistletoe, to kiss on the cheek, not on the lips, to avoid spreading germs. Pretty good advice, especially if you've got one of these hanging around:
I found the idea for this bad boy online somewhere and knew my kids would love it. It is so simple, and is a fun replacement for mistletoe if you don't happen to have any. All you need is a bag of hershey kisses (or you could go with the hershey hugs, if you're more of a hugging person), a styrofoam ball (found at any craft store), hot glue gun, and a ribbon or strong string to hang it with.
First you will need to arrange a way to hang it. I punctured mine with a super big needle, threaded ribbon through it, and then tied off the end to keep it in place. If you don't have a needle, you can use anything else that is relatively sharp and narrow, like a screwdriver. To put it together with kids, I held the ball and put a generous dot of hot glue on the ball, and let my boys stick the kisses on, one by one, until the entire ball is filled up.
I'll admit, it is sort of wacky looking, but everyone around here really likes it. I had already found that mistletoe ball thingy at Joann but wasn't very happy about. It's sort of ugly I think. Thatcher claims that when he is 10, he will be tall enough to reach the kissing ball and he will eat all the chocolate off of it. Sure...

Monday, December 7, 2009

Tuesday, December 1, 2009

Super Cute Holiday Wreath in 10 minutes

I really wish I had paused long enough to snap a 'before' picture but I just didn't think to. However, just imagine this wreath with nothing but the pinecones and one of those fake velvet red bows on it - that's how it came. We got it at Lowe's when we got our Christmas tree for about $13.00. I was fully prepared to leave it as is and call it good. Until. Until I passed through the floral department at Joann's.

As a general rule I steer clear of the floral department. I have no business there. Frankly, it frightens me a little with all it's foam, spanish moss, and sparkle dusted fake foliage. This day however, I was in need of a wreath hook to hang said Lowe's wreath. I happened upon an entire aisle of what I will call "doodads" for lack of a better term.
Christmas doodads - holly, snowflakes, leaves, berries, fake candy, little trees, letters, snowmen, sparkly balls, assorted foliage, and more. Despite my lack of floral arranging skills I found myself snatching up a few items. All 50% off. I spent $4.80 on the doodads, and $2.00 on a spool of ribbon, came home, and spent 10 minutes putting it together. Not too shabby. I think I might have to visit the floral department a little more often.

Wednesday, November 25, 2009

Bowl Full of Blueberries Ornament

A buyer on Etsy contacted me with a random request. Who doesn't love random requests? Her 18 month old LOVES blueberries and was wondering if I could make her an ornament involving a bowl full of blueberries. How could I say no?

This is what I came up with. The buyer was really pleased with the results as was I. Hopefully her daughter likes it as well. I had never made a bowl before, but I thought, how hard could it be? This girl can make just about anything out of felt (except for you 'scoop of icecream.' I'm still bitter over my failed endeavors to make scoops of ice cream).

ANYWAY, I made it this camel/brown color so that is sort of looked basket-ish. It was a nice change of pace for me, I always enjoy special orders.

Wednesday, November 18, 2009

Candy Cane Ornaments

I know a lot of people are interested in helping their children understand the true meaning of Christmas. And if somehow, in doing this, I can involve crafts and sweets, well, it's right up my alley.

My mother-in-law gave me this book, "The Legend of the Candy Cane" a few years ago that explains the meaning of the candy cane shape and colors through a really touching story. It would be a nice book to share with your children during the Christmas season, and to add to it, you can do this candy cane craft along with it.


Though I came up with this idea myself, I'm sure I am not the first to think of it. These are simply chenille pipe cleaners you can find at any craft store, twisted together, and then bent into the candy cane shape.


Pretty simple craft, even for preschool age. If you're making these for a large tree, I would use two of each color twisted together, it looks a little better (see photo below). Though if you're looking to decorate a mini tree, then cut your pipe cleaners in half and twist one of each color together.


Looks pretty cute on the tree, right? Your kids will love that they made the ornaments themselves.

Tuesday, November 17, 2009

Tree Skirt for your Mini Christmas Tree


I am not one to get the Christmas decorations out before Thanksgiving, but I do make an exception for Christmas crafts. Christmas time can get a little busy so getting a head start on your projects is always a good idea.

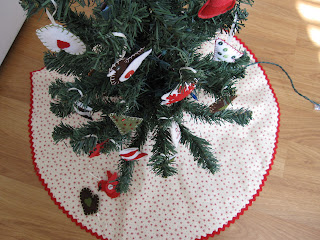
A lot of people have these little fake trees now, but if you don't, they are fairly inexpensive, and fun to decorate. I got mine at Smith's Marketplace (Utah's version of Fred Meyer) for about $5.00 a couple years ago. Mine came with a really ugly base, pretty much it was the plaster/cement mold they stuck the tree in the get it to stand up. What was a crafty girl to do? That's right, make a mini tree skirt.

I've said it before, and I'll say it again, my sewing skills are mediocre, so ANYONE can make this, it is so simple. I know a lot of people that have sewing machines but never use them, claiming they don't know how to sew. Forget about it, you can make this.

Here's what you'll need:

3/4 - 1 yard Fabric of your choice
3/4 - 1 yard Quilted Batting
Matching thread
Matching ric rac
Glue Gun

First you will need to decide how big you want your skirt to be. This will depend on your tree size and personal preference. You want the skirt to be proportional to your tree, so laying your fabric out around your tree you can get a general idea for how big you'd like it to be. My tree is only 2 feet tall, and as it turns out, giving the skirt a 2 foot diameter worked out best.

Once you decide on size you will need to make yourself a pattern. In this case, your pattern will consist of a piece of string and a marker of some sort. Take your string, tie it to a marker, and measure out half of whatever you decide the diameter is for your tree (my diameter was 24", so I measured out 12"). Lay out your fabric and quilted batting (wrong sides together). Mark the middle of your fabric. Place the string in the middle of your fabric, holding it down with your finger, and mark a circle on your fabric. This should create a nice big, even circle. Go ahead and pin your fabric and batting and cut the circle out.

Once you have your circle cut and properly pinned, sew the pieces together along the outside edge, being careful to stay as close to the edge as possible.


This is what I meant by "quilted batting." I'm not sure if that is the actual name of the product, but it's pretty much a thin layer of batting, with a finished side.

Once sewn together, go back to the mark you made in the center of your circle. You will need to create an opening for the base of the tree to come through. This too will depend on the size of the base your tree has. I just eyeballed mine. First I drew a circle with a 2" diameter and cut it out. Then I cut a 4" slit from the circle. At this point, it would be a good idea to test to make sure the opening is big enough for your base.


If so, pin together and sew again, like before, staying as close to the edges as possible. It won't look really pretty, but it will do the job and will not be seen once you have the skirt in place under the tree.


To finish the rough edges around the skirt, I glued ric rac the edge. If you're not comfortable using a glue gun, or don't have one, Tacky Glue would work as well, just make sure you let it dry completely before you use the skirt.


On a side note, I mentioned above that my base was some kind of cement mixture. It was a rough, scratchy surface. Not only was the dining room table in danger of getting scratched, but my skirt was snagging on the rough surface when I'd put it off and on. So I took a circle of felt, set my base on it, and brought the felt up and around the base and used my trusty glue gun to glue it in place. Love my glue gun.

Sunday, November 15, 2009

Advent Calender

I thought I'd better get my butt in gear and get this Advent Calender posted in case there was anyone out there that wanted to tackle it. This pattern came from an old magazine that I don't know the name of, so I can't give credit. I got my hands on a copy of it from my sister-in-law who was also making it at the time (Aubrey, is yours finished yet????).

So here is my plan - in lieu of writing out a long and drawn out tutorial, I will post pictures of my finished product to get you inspired to create, and then I will mail you a pattern and set of directions. Just drop me a note in the comment section if you're interested and I will be more than happy to set you up to make your own. Here is the finished product:


This pattern is great, as you can change it up a lot of different ways to suit your needs and sewing skills. I used wool felt and the total cost for the wool felt was about $15.00, though if you wanted to use acrylic felt, your cost would most likely be half of that (maybe even less, as Joann often has their acrylic felt on sale).

The calender in the magazine used red and white as their main colors, though you can truly make this any color you'd like. I choose two reds, two greens, with accents in brown. The calender has a very basic set up, with 5 rows, each with 5 pockets totaling 25 days for your countdown, and a simple design above.

The numbers, as well as the reindeer/snow scene is all stuck on with iron on adhesive (I prefer Heat 'n Bond Ultrahold), so once you have them cut out, they go on pretty fast. I simply enlarged numbers on my computer, printed them out to the desired size, and cut them out for a pattern.


Now, if you're feeling lazy, you can stop here and simply fill up the pockets with candy for each countdown day. OR, if you're feeling crafty, you can whip up some felt ornaments.

I will include the pattern for each of these ornaments with the calender directions. I have one of those little mini fake trees that I use, so that each day, my boys can get an ornament off the calender to put on the tree, and by Christmas day you will have decorated the tree. I have 25 ornaments, one for each day, though since I have two kids, I put two ornaments in each pocket (so they each get to hang one) and fill the rest of the empty pockets with candy.

You will need basic sewing skills, but that is it. The required sewing is all pretty simple (just straight lines!) so anyone can tackle this. The ornaments are either hand stitched, or stuck together with Heat 'n Bond. It took me two weekends (about 4 or 5 day) to finish this so you have plenty of time to make one for your kiddos before December 1st.

Who's going to make one????


Next up? Tree skirt for your mini tree!

Friday, November 13, 2009

Sewn Sweets Three Tiered Cake


Sewn Sweets Three Tiered Cake

I made this cake about a year ago for my shop, and then never again until a friend and fellow etsian requested it. I was a little afraid since I had thrown out the pattern I'd made for it, but I think I managed to make it even better than before. Go ahead - click on my picture - check out my stitching, this baby is completely hand sewn. Sometimes I am just in awe of my skills ;). The three tiers are not sewn together so you can stack them up yourself. There are a total of 9 flower (3 sizes) that stick naturally to the cake (felt likes to stick to felt).

The Advent Calender post is still on its way, just waiting for my camera to charge, so stay tuned!

Wednesday, November 11, 2009

Mini Muffin Tins

Aside from the obvious, intended usage, I found quite a few educational uses as well with these cute little muffin tins. This mini size is pretty popular right now so you can find a mini muffin tin almost everywhere, though I'd suggest getting a Wilton one from Micheal's, since you can use one of the 40% off coupons they send out each week.


I'd made these mini cupcakes for Sewn Sweets when a regular customer of mine clued me in that they happened to be the exact size for the mini muffin tins. She ended up ordering a dozen mini cupcakes of mine to fill up the tin for her granddaughters. Nice grandma, huh?


So of course I had to go out and get one for myself. Look how fun that is - I would have loved to play with these as a little girl. Once I started homeschool with my boys this past fall I discovered other uses for this tin. Children are natural born sorters. Or so I think. Why else would my kids love to sort the laundry (a chore I generously allow them to do)? Here's one of my ideas:


I did this one for Thatcher who is 4 and is in preschool. I gave him all my buttons and let him sort out the colors. Pretty easy for him, but it kept him entertained. Another idea is to number each section 1-12 and then let your kiddo put the correct amount of buttons (or beans or whatever you have on hand) into each well. Good counting practice. This one I created for Schooler:


For our unit on money I cut out little circles with amounts written on them and stuck them to the bottom of each well. Then he had to put the correct amount of change into each section. As your child progresses in their knowledge you can switch out the change amounts for more difficult amounts. It is a fun, hands-on way to help your kiddo learn about counting and coins.

Or, you can just make cupcakes.

Tuesday, November 3, 2009

Off-Season Crafting

I am quite the fan of off-season crafting. Not familiar with the term? That's ok, I just made it up. You know how you start a craft, and it takes forever to finish, and before you know it, you sort of start to loathe your project and can't quite make yourself work on it anymore and finish it? This problem can be compounded if your project happens to be seasonal and the season floats on by with your craft sitting there all lonely and unfinished. I know you know what I'm talking about, you all have unfinished projects. It's ok.

Back to off-season crafting. A few Januarys ago I started a small decorative wall hanging quilt with gingerbread men on it that required hand quilting. Gingerbread in January? Yes, I know I was out of season, I'm daring that way. I worked all of January on it and probably into Febuary, but I hand-quilted the heck out of that thing and boy was I tired of it. It was so nice to stuff the thing away in the closet and forget about it until the next Christmas season. Nicer still, to pull it out FINISHED and finished in time for the season.

This past summer I started a wool applique wall hanging for Halloween called Gourdy's Gang.


Halloween in summer? It hardly seems right, though it felt so good (sorry that was lame). But seriously, consider it folks. Go out there and check out the Halloween crafts that are on clearance right now. If it's too soon for you, wait until January to work on it. Why don't you try this:


If you can cut and glue, you can make this. It was really fun and simple and I had all the necessary items in my stash to make it (if you scrapbook, you probably will too). I had this idea last year, but never got around to making it. This year I stumbled on these directions and knew I had to do it. The directions from the Polka Dot Chair are great though I would suggest you make a triangle template for each triangle size and then trace them onto the black cardstock and patterned paper. This way, you will get more triangles out of your paper (3 per 12x12 paper with the larger triangle, and 4 per 12x12 with the smaller triangle). If this sounds confusing at all, read The Polka Dot Chair's directions and you'll get what I'm saying.

If you're doing this for a fireplace mantle, the saying "got candy?" would be better since it is shorter and a better fit for a mantle. I have no fireplace so length was not an issue and I went for the full "happy halloween." Sorry the pictures are bad. Daytime light behind the banner made it hard to photograph during the day, so I was left with artificial light at night (not my favorite lighting for taking pictures).


Or, if you're looking for a craft for the coming seasons you can always just change the wording to "Give Thanks" or even "Merry & Bright." Either way, it is a fun (and easy) craft that can be finished in a day.

Coming up next? Advent Calender!

Tuesday, October 27, 2009

Doll Quilts/Buddy Blankies

Let me first say that my experience with quilting is very limited, and I am not a very good seamstress. Even with my skills lacking this was still a project I could tackle. I first saw this tutorial for doll quilts over at Girls Gone Craf-T. Katherine discovered the tutorial and had whipped up a few little quilts in one weekend. If you'd like to see her results, go here (http://girlsgonecraf-t.blogspot.com/2009/01/doll-quilts.html) she made some pretty cute doll quilts for her girls, as well as one for a friend's little boy.

Katherine's boy quilt inspired me to make some for my boys. While they don't have any dolls they do have a multitude of buddies (what they call stuffed animals) that join them each night when they go to bed. I followed the tutorial and here is how mine turned out:

Don't they look all cozy in their little blankies? My boys like wrapping up their buddies in bed with them at night. I went the easy route with the binding and quilting parts and just used my sewing machine since I knew my boys would not care.


Tired of Thomas fabric, I decided to make one for my niece Lucy. The original tutorial calls for these tiny little squares that took forever to sew together and became hard to keep straight, so for Lucy's I increased my square size and quilt size and added the pillow. The quilt top went together much quicker with larger squares.


For the quilting, I used a scrapbooking chipboard flower and traced it on my squares with a diappearing ink pen, then used my sewing machine to quilt it.


Hopefully this little quilt will be keeping Lucy's dolls and buddies warm this Christmas.


You can check out the fun tutorial on Crazy Mom Quilts if you'd like to make one or two yourself. If you know what you're doing (or not really, like me) it's pretty easy to change up the quilt size to suit your needs. This is a great gift idea for any little one in your life that enjoys playing with dolls or even just pretend play like my boys. Just don't call them DOLL quilts. They're BUDDY blankets.